Customize Kwoot from A to Z.
A visual guide with 32 tutorials and 96 screenshots to cover settings available in the admin: identity, form, offers, spaces, payments, documents and customer follow-up.
Each admin setting to prepare before launch.
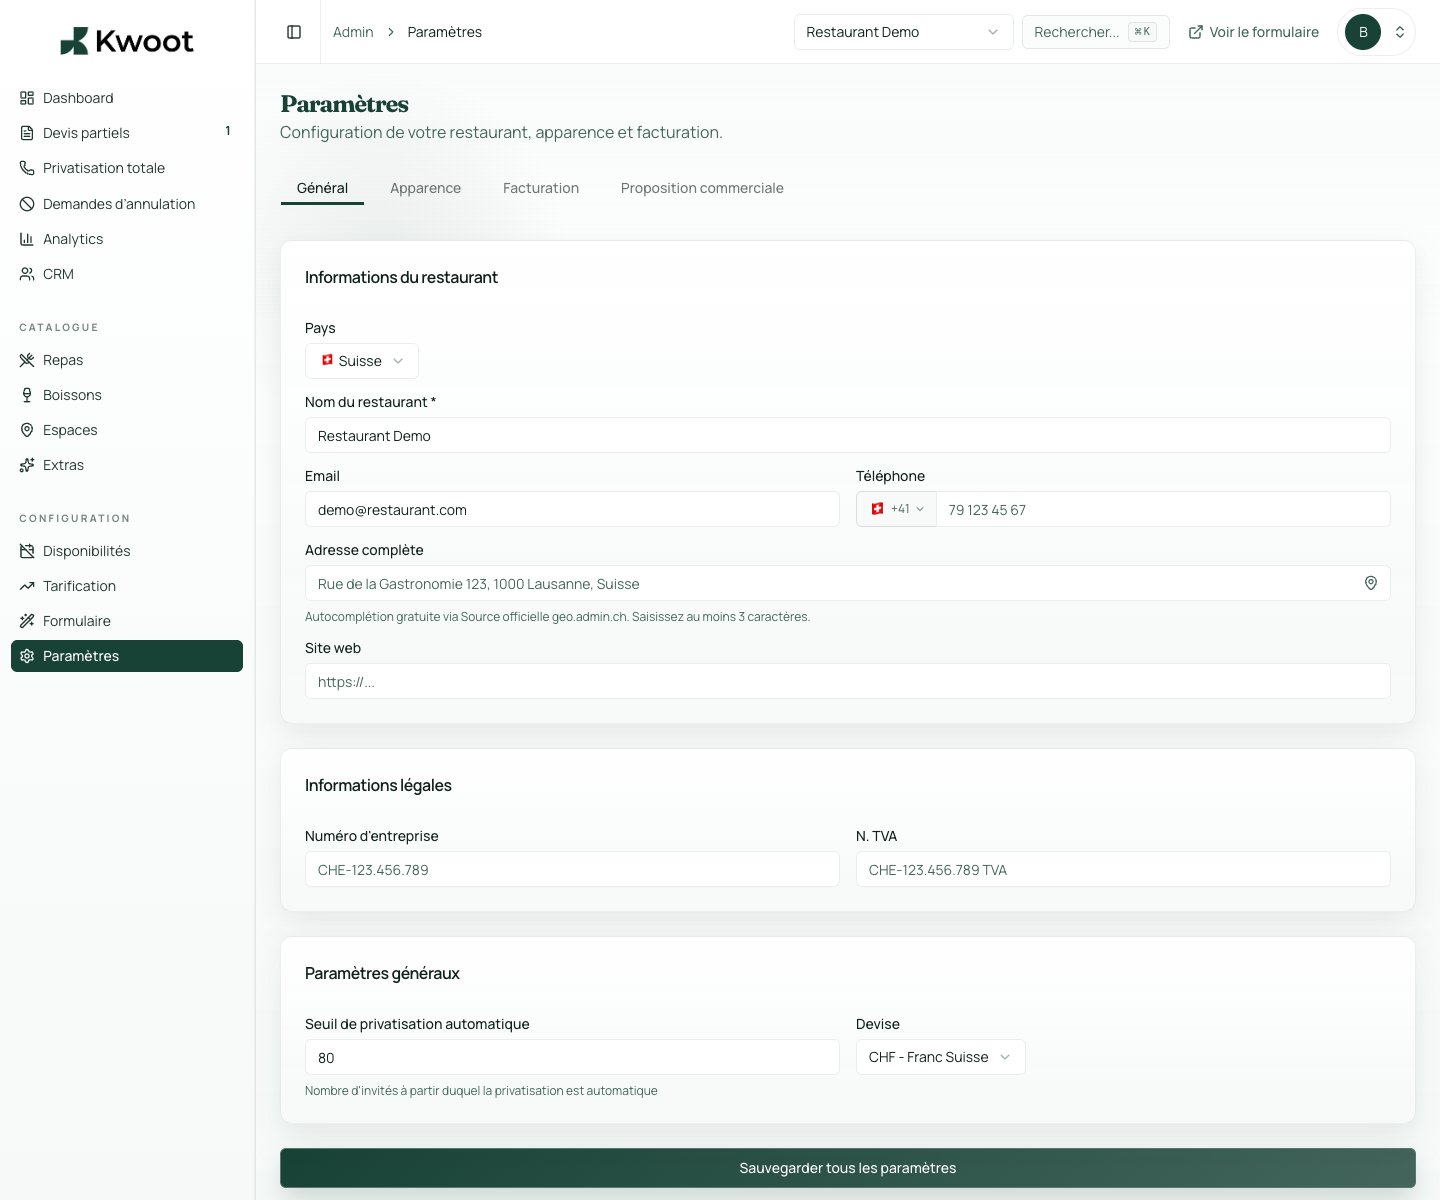
Start with the information visible on documents, customer portal and emails: public name, country, address, telephone, email and website.
Open the tutorial → Legal Add legal informationLegal numbers avoid incomplete documents. They are especially useful for quotes, invoices, T&Cs and formal exchanges with companies.
Open the tutorial → Base Set currency and threshold for full private eventThese two settings structure the entire process: the currency displayed everywhere and the number of guests from which the form switches to total private event.
Open the tutorial → Appearance Add logo and main colorThe logo and main color provide continuity between your site, the form, the quote, the customer portal and the emails.
Open the tutorial → Appearance Customize the footer, acknowledgments and termsFooter text, conditions and their visibility avoid generic messages. They can be displayed on quotes, invoices and emails according to your needs.
Open the tutorial → Payment Configure bank detailsBank details are used for deposits, balances and invoices. They must be easy to read to avoid poorly referenced payments.
Open the tutorial → Payment Pay deposit, balance, invoices and customer cancellationThis block defines what the customer must pay to confirm, when the balance is due and until when they can request a cancellation.
Open the tutorial → Taxes Configure VAT, taxes and service chargesTax rates change the calculation of menus, drinks and extras. They must be validated with your accountant before launch.
Open the tutorial → Documents Prepare the commercial proposalThe commercial proposal makes the quote clearer for important events. It must reflect your style, your arguments and your conditions.
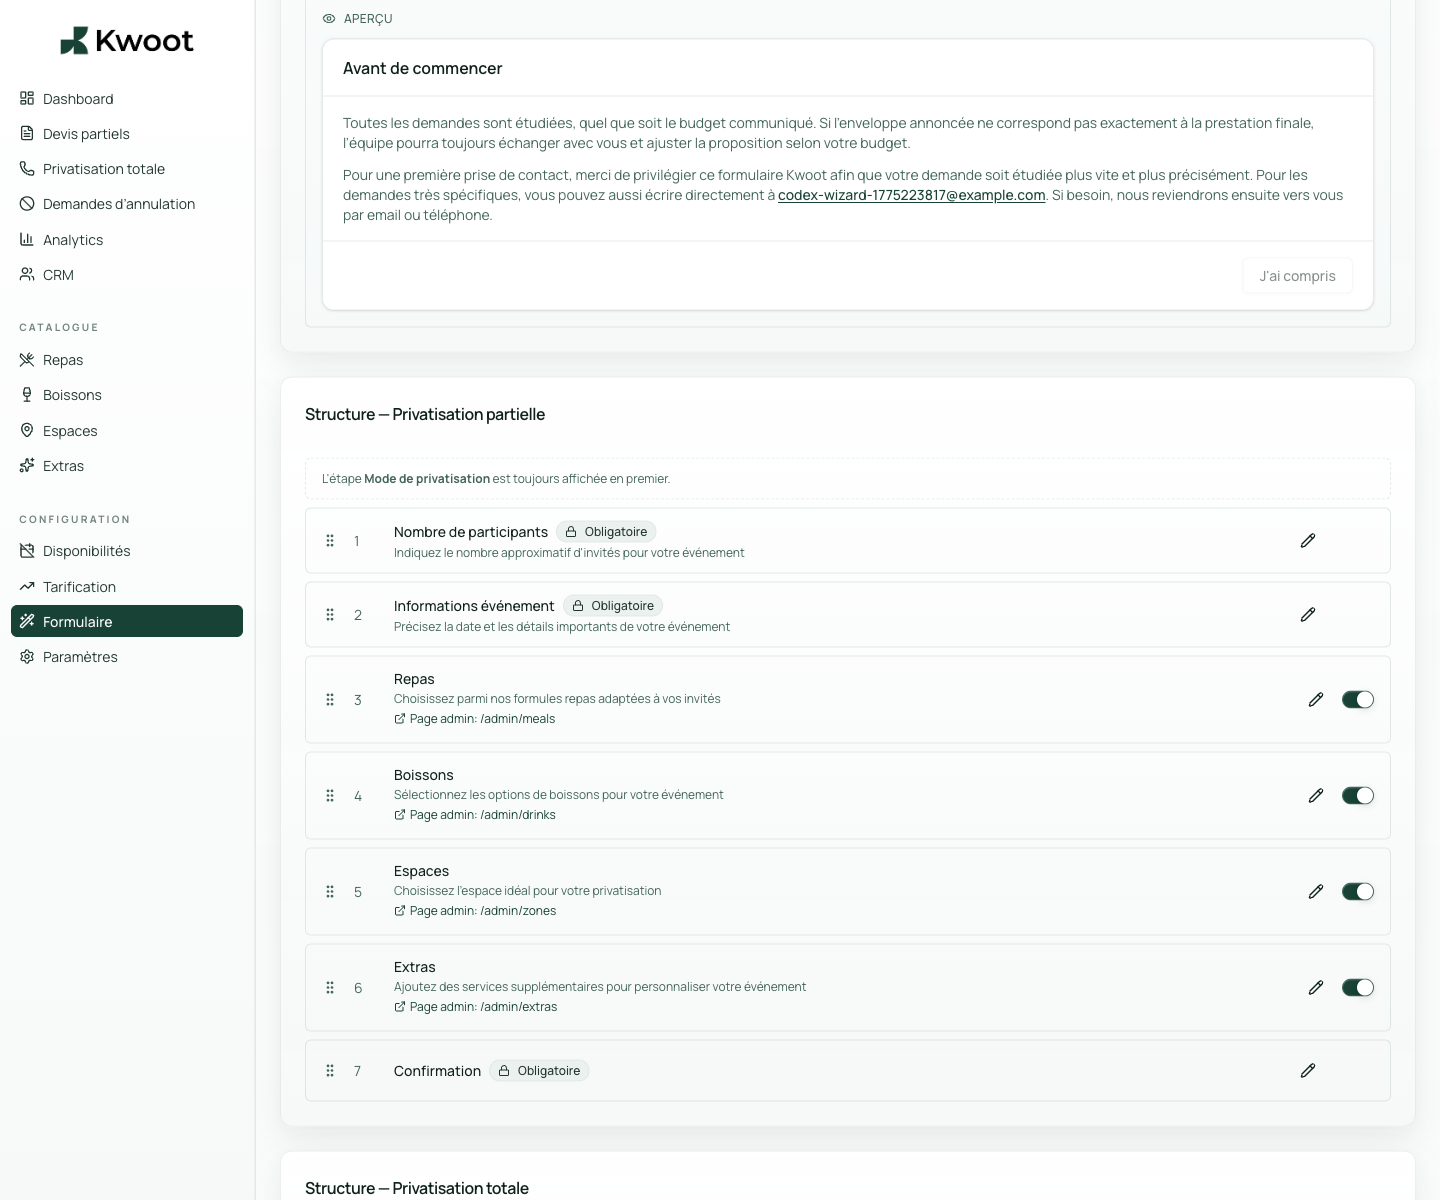
Open the tutorial → Form Add an intro pop-up to the formThe pop-up serves to reassure the customer before they begin: response time, information requested, useful contact or clarification on private event.
Open the tutorial → Form Activate, deactivate and rename quote wizard stepsYou can keep only the steps useful to your sale: participants, event, meals, drinks, spaces, extras and confirmation.
Open the tutorial → Form Modify field labels and placeholdersThe words on the form should speak like your team. You can adapt the wording, examples and help to avoid questions afterwards.
Open the tutorial → Form Customize the total private event formWhen the customer exceeds your threshold, Kwoot can directly request the essential information for a complete private event, without too long a journey.
Open the tutorial → Form Create the types of events offeredBirthday, seminar, cocktail, civil wedding, company dinner: these labels help the client to recognize themselves and the team to filter requests.
Open the tutorial → Integration Share the direct link or embed the widget on your siteThe form can be sent by direct link or integrated into your site. This is what makes it possible to replace a simple “contact us” button.
Open the tutorial → Emails Control emails sent to the client and the teamThe email tab allows you to understand what the customer receives at each stage: loan quote, deposit, balance, confirmation or internal notification.
Open the tutorial → Meal Create menus and meal plansMenus should be specific enough to sell, but not too long. Kwoot can display seated options, cocktails, tapas or specific requests.
Open the tutorial → Meal Configure personalized menus, tapas and validity periodsFor restaurants that create tailor-made menus, you can prepare items, validity periods and selection rules.
Open the tutorial → Drinks Create drink packagesDrinks can be sold per person, as a package or with a specific request. The goal is for the customer to quickly understand what is included.
Open the tutorial → Extras Add extras and additional servicesExtras avoid forgotten quotes: technology, cloakroom, decoration, DJ, private event of terrace, additional staff or fixed costs.
Open the tutorial → Spaces Create spaces, categories and capacitiesEach zone must correspond to a real salable space: entire room, private lounge, terrace, bar, floor or combination of rooms.
Open the tutorial → Spaces Set consumption minimums per spaceThe minimum spend must be configured in the right place to avoid unclear negotiations. Kwoot can display it and take it into account in the files.
Open the tutorial → Spaces Create zone combosCombos allow several spaces to be sold together: room + terrace, lounge + bar, full floor or larger partial private event.
Open the tutorial → Spaces Prepare weather options for outdoor spacesFor a terrace or rooftop, the weather alert allows you to anticipate a fallback solution, another date or a marquee option.
Open the tutorial → Diary Define available times and periodsAvailability helps the client choose a realistic date and prevents the team from dealing with impossible requests.
Open the tutorial → Diary Add exceptional closuresClosures avoid requests on blocked dates: holidays, work, internal events, private event already signed or seasonal closure.
Open the tutorial → Pricing Create a price rule per day or periodDynamic pricing allows you to increase the price during the most popular times: Friday evening, Saturday, December, brunch, high season.
Open the tutorial → Pricing Create a seasonal ruleA seasonal rule covers an entire period: end-of-year celebrations, trade fairs, high tourist season or months of high demand.
Open the tutorial → Estimate Check quotes, documents and statusesAfter personalization, quotes must remain simple to follow: draft, sent, signed, deposit expected, paid or archived.
Open the tutorial → Customer Control the experience in the customer portalThe client portal is the page that the client consults to follow their file, sign, find documents and verify payments.
Open the tutorial → CRM Organize customer files and historyEven if it's not a design tweak, it's an important business customization: your customers, businesses and histories must remain clean.
Open the tutorial → Follow up Customize your tracking routineThe dashboard and key figures cannot be adjusted like a logo, but they must become your routine: what to raise, what to sign, what to cash out.
Open the tutorial →Each card now opens a dedicated tutorial.
The details are separated into short pages to be easier to read, share and reference. This page remains the summary of all the customizations available in the admin.
Questions that come up before configuration.
Does this guide cover all the settings available in the admin?
Yes, it covers the settings available today on the admin side: general, appearance, invoicing, form, offers, spaces, availability, pricing, quotes, customer portal and tracking.
In what order should Kwoot be configured?
The simplest: general settings, appearance, invoicing, form, menus, drinks, spaces, availability, pricing, then complete test with a quote.
Which settings are directly visible to the customer?
The customer mainly sees the logo, color, form texts, menus, drinks, extras, spaces, prices, conditions, payment instructions, documents and customer portal.
What settings should be tested before putting the form online?
Test at least a partial request, a total private event request, a signed quote, a deposit, a customer portal and an email received on the customer side.
Can we customize several establishments differently?
Yes on multi-establishment configurations. Each location may have its own information, rules, spaces, offers, availability and conditions.
Want to set up the first location with us?
We can use your menus, spaces, conditions, business rules and documents during onboarding.